
छविGPT Image
Create a premium studio product photograph of a custom
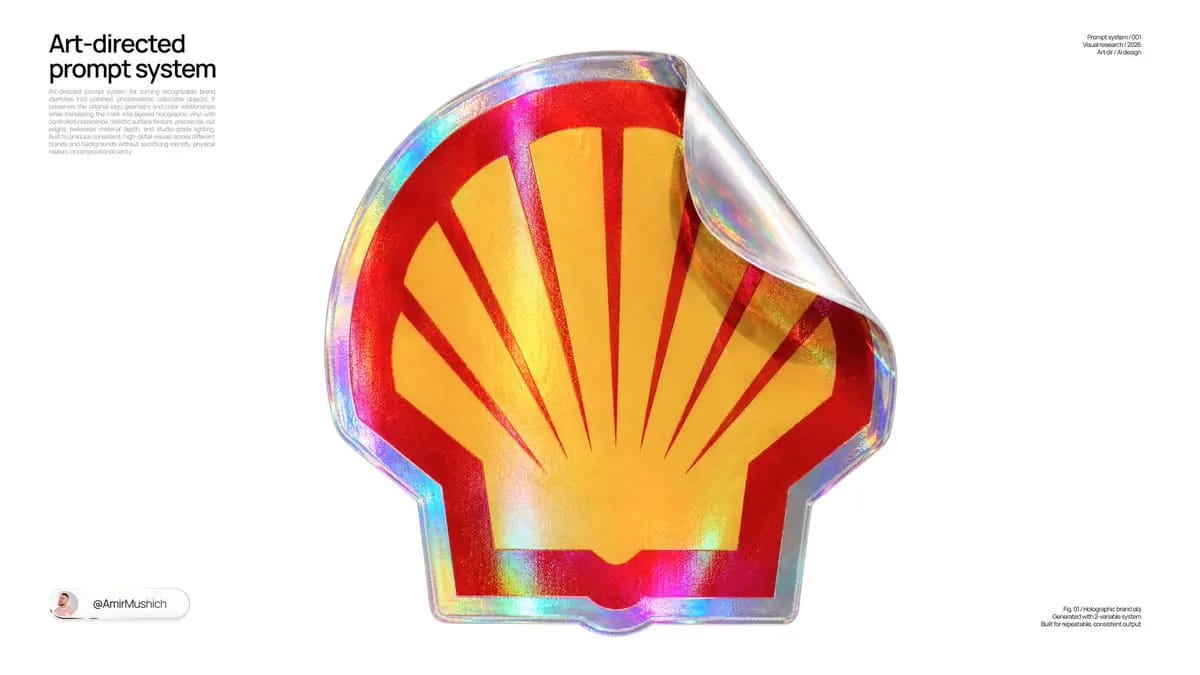
[BRAND_NAME = [Brand Name]] [BACKGROUND_COLOR = [Background Color]] Create a premium studio product photograph of a custom die-cut vinyl sticker for [BRAND_NAME]. Automatically identify the brand’s most recognizable official symbol,...
प्रॉम्प्ट
[BRAND_NAME = [Brand Name]]
[BACKGROUND_COLOR = [Background Color]]

एक प्रीमियम स्टूडियो प्रोडक्ट फ़ोटोग्राफ़ बनाएँ जिसमें [BRAND_NAME] के लिए कस्टम die-cut vinyl स्टिकर हो।  ब्रांड के सबसे पहचाने जाने वाले आधिकारिक symbol, emblem, या standalone logo को स्वतः पहचानें और उसकी authentic silhouette को स्टिकर की shape के रूप में उपयोग करें। mark के characteristic proportions, geometry, internal spacing, और core color relationships को सुरक्षित रखें। identity को redesign, simplify, या generic interpretation से replace न करें। यदि ब्रांड मुख्य रूप से wordmark द्वारा represent होता है, तो wordmark को यथासंभव accurately और legibly reproduce करें।  logo को एक असली, collectible-grade laminated vinyl object के रूप में प्रस्तुत करें। transparent prismatic finish के नीचे printed brand artwork स्पष्ट रूप से दिखाई देना चाहिए। surface पर cyan, turquoise, magenta, violet, emerald, amber, soft gold, और pearlescent white में controlled spectral reflections बनाएँ। iridescence curvature और lighting के साथ naturally shift होनी चाहिए, न कि flat rainbow gradient जैसी दिखनी चाहिए।  material को convincing physical depth दें: smooth glossy laminate, subtly raised printed areas, fine vinyl grain, restrained micro-scratches, faint handling marks, realistic edge thickness, tiny surface imperfections, और crisp die-cut borders।

एक साफ़ upper corner जोड़ें जो हल्के से peeled back हो। peeled corner structurally unified रूप में एक single smooth curled piece ही रहना चाहिए, multiple layers या separate flaps में split नहीं होना चाहिए। वह neat, premium, और physically believable महसूस होना चाहिए, जिसमें smooth curvature, subtle translucency, controlled internal reflections, और accurate shadows हों। thickness, edge behavior, और underside visibility के माध्यम से object की laminated construction को suggest करें, लेकिन messy delamination, tearing, fraying, या visibly separated multi-layer stack न दिखाएँ। स्टिकर new और collectible महसूस होना चाहिए, old या worn out नहीं।

Composition: एक oversized स्टिकर vertical 4:5 frame में centered, जो image के अधिकांश हिस्से को occupy करे। इसे लगभग front-facing दिखाएँ, हल्के three-quarter perspective के साथ, ताकि thickness और curled corner visible रहें। silhouette clean और instantly recognizable रखें।  स्टिकर को seamless solid [BACKGROUND_COLOR] studio background के सामने isolated रखें। स्टिकर space में suspended दिखना चाहिए, किसी floor या surface पर resting नहीं। upper left से large diffused key light, opposite side से narrow rim light, restrained frontal fill, और carefully controlled highlights का उपयोग करें। background को clean और even रखें।

High-end macro product photography, 85–100mm lens character, shallow but controlled depth of field, main logo face sharply focused, distant edges और peeled corner slightly softer। High dynamic range, realistic contrast, physically accurate materials, premium collectible-object presentation, polished commercial photography, highly detailed।  poster layout, captions, slogans, social-media interface, packaging, hands, multiple stickers, decorative objects, scenery, smoke, excessive bloom, neon cyberpunk lighting, liquid deformation, melting surfaces, chrome replacing the vinyl, distorted logo geometry, invented symbols, duplicated elements, misspelled brand text, visible floor planes, pedestal surfaces, contact reflections, mirrored reflections, या grounded tabletop shadows न जोड़ें।
इस प्रॉम्प्ट का उपयोग कैसे करें
- 1प्रॉम्प्ट को ठीक वैसा ही कॉपी करें, फिर अपने पसंदीदा मॉडल या Ideart प्रोजेक्ट में पेस्ट करें।
- 2प्रोडक्ट, विषय, ऑडियंस और स्टाइल डिटेल को अपने संदर्भ से बदलें।
- 3पहले एक बेसलाइन परिणाम जनरेट करें, फिर सबसे मजबूत दिशा को कैंपेन, इमेज सेट या वीडियो कॉन्सेप्ट में रीमिक्स करें।
पास के प्रॉम्प्ट पथ देखें
मॉडल
इस प्रॉम्प्ट से बनाएं
छवि प्रॉम्प्ट को तैयार क्रिएटिव प्रोजेक्ट में बदलें।
प्रॉम्प्ट सेव करें, रेफ़रेंस इमेज या नोट्स जोड़ें और Ideart को उसी क्रिएटिव थ्रेड से अगला उत्पादन कदम आकार देने दें।